Introduced in 1.7
Requirement Yogi lets you rename requirements in batch. It also synchronizes the new names with JIRA.
See the product, Requirement Yogi.
You've written your requirements, but now there's a problem: You want to change one or more requirement key. Let's start by selecting the requirements to rename.
Selecting Requirements
With the 1.7 release of Requirement Yogi, we've added a new way of selecting: beside the Search Query, you can now tick requirements in the search screen.
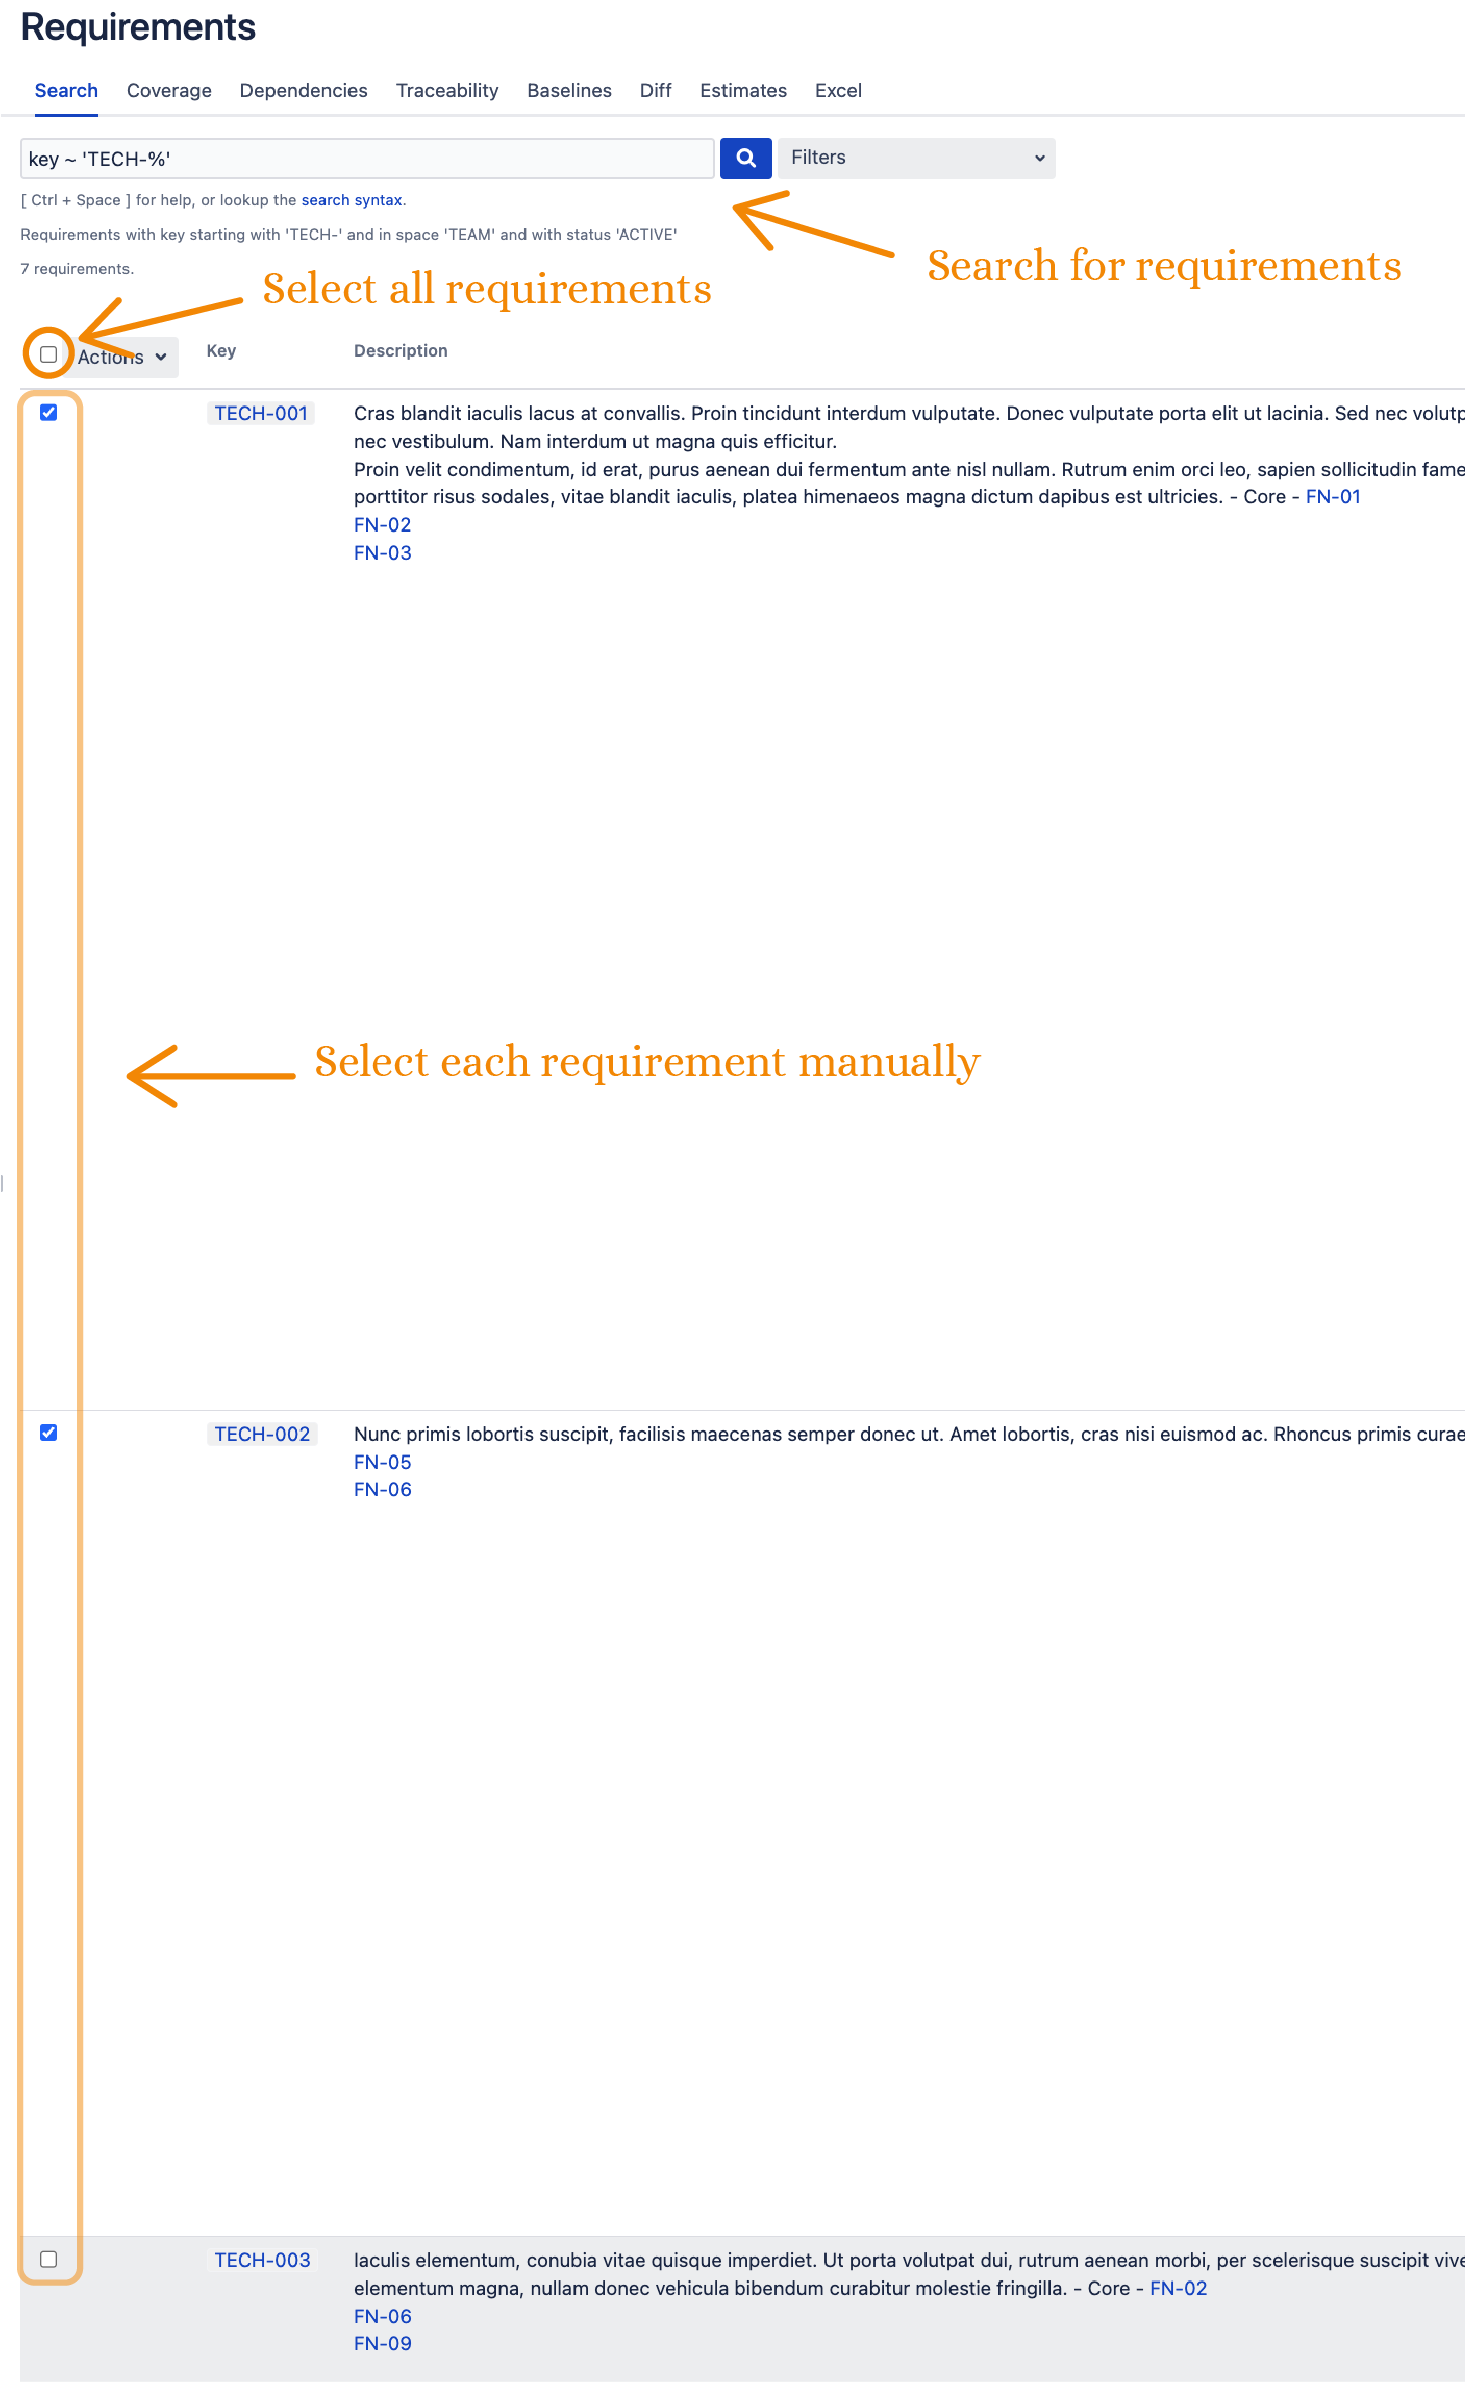
The system is intuitively simple, yet powerful: Ticking the box next to "Key" will select all requirements in the current space, even those who are not shown if your number of requirements exceed the display limit. You can then uncheck tick boxes to exclude requirements from your search. Or you can check particular tick boxes to select only these requirements. You can even combine this with the Search Query: Start by performing a search with the Search Query (For example, let's say we want requirements beginning with "TECH" : key ~ 'TECH%' ; See Search Syntax for more informations about the Search Query), then if you tick the checkbox for all requirements, only those from the query will be selected. This allows you to refine your queries easily.
Renaming a single Requirement
Once you've selected at least one requirement, a dropdown menu will appear next to "Key":
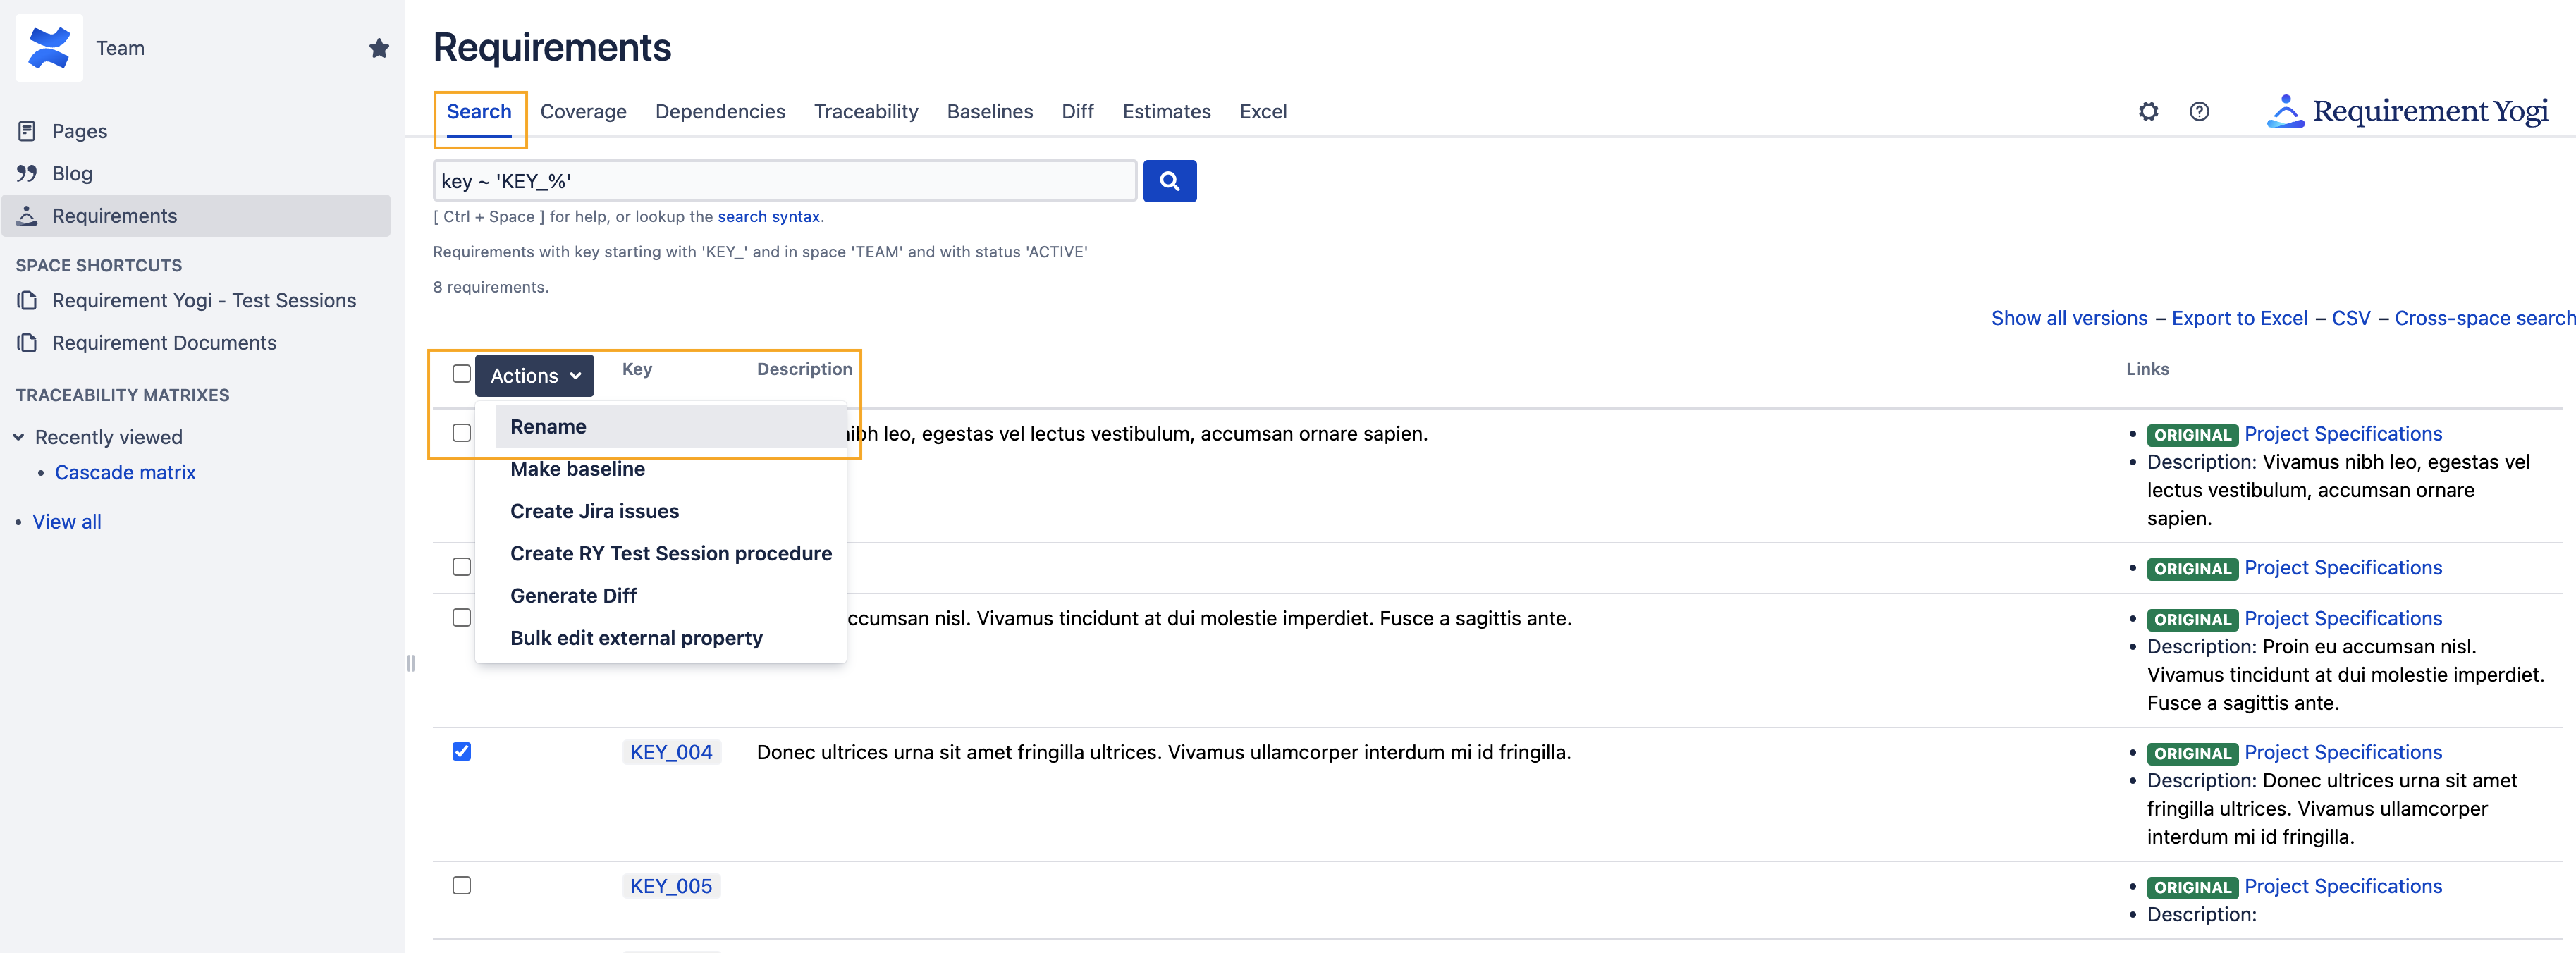
Click on "Rename" to access the renaming wizard.
.png?cb=fabbfc6037a7a8d00c8bf7dfa01e8eed)
This wizard allows you to entirely rename a requirement, just type the new key you want and Requirement Yogi takes care of everything for you: Obviously every occurrence of this requirement is changed in your documents, and the dependencies are modified as well. Even your JIRA issues are updated, if you have linked your Confluence instance with JIRA and installed Requirement Yogi on JIRA.
Renaming multiples Requirements
Of course sometimes you'll want to rename a lot of requirements in a single step: Requirement Yogi also handles it. Just selects more than one requirement on the Search screen, then click rename:
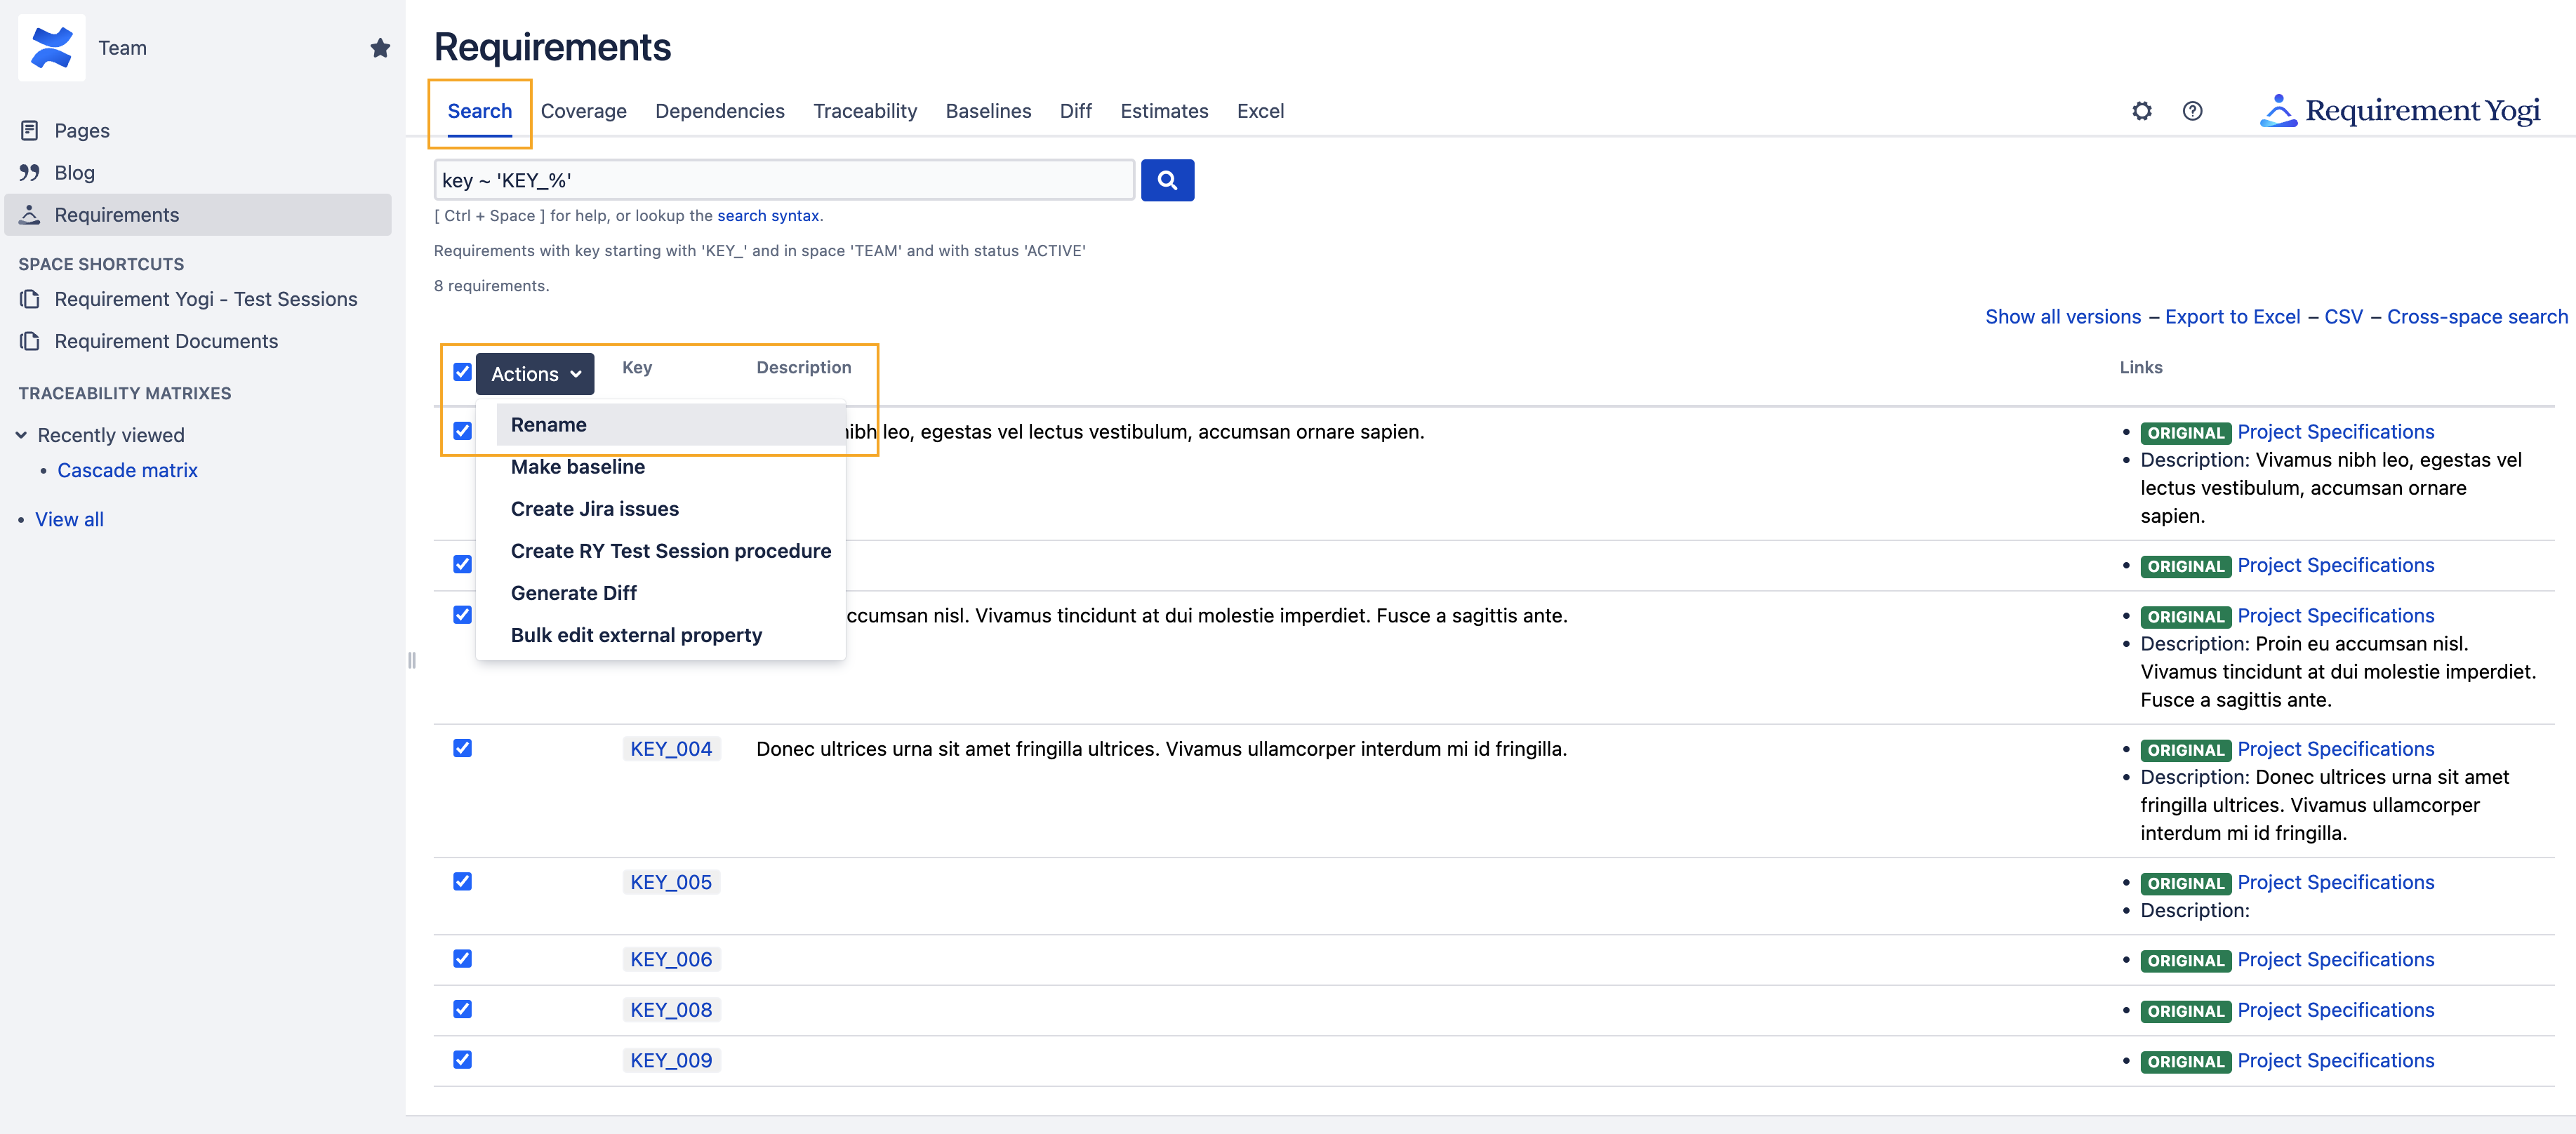
Notice how we used the Search Query to pre-select our requirements. When you select multiple requirements, Requirements Yogi breaks each key into 3 parts: the prefix, the middle key, and the suffix. Prefix and suffix are a common pattern within all the selected requirements, while middle key is the variable part. You can then change your prefix and suffix, and Requirement Yogi will apply the same modification to all your requirements.
.png?cb=669d218c441203d2d67bc4447a1d1287)
You can only edit the first line, but the others lines are live-updated. Requirement Yogi only shows a few requirements to keep the wizard clear, and adds a line indicating "..." if you have a lot of requirements. Don't worry, they'll be renamed as well.
Renaming Task Status
Once you've changed your requirements' key, click on rename to start the renaming task. You'll be redirected to a new page, which show you detailed informations about the task.
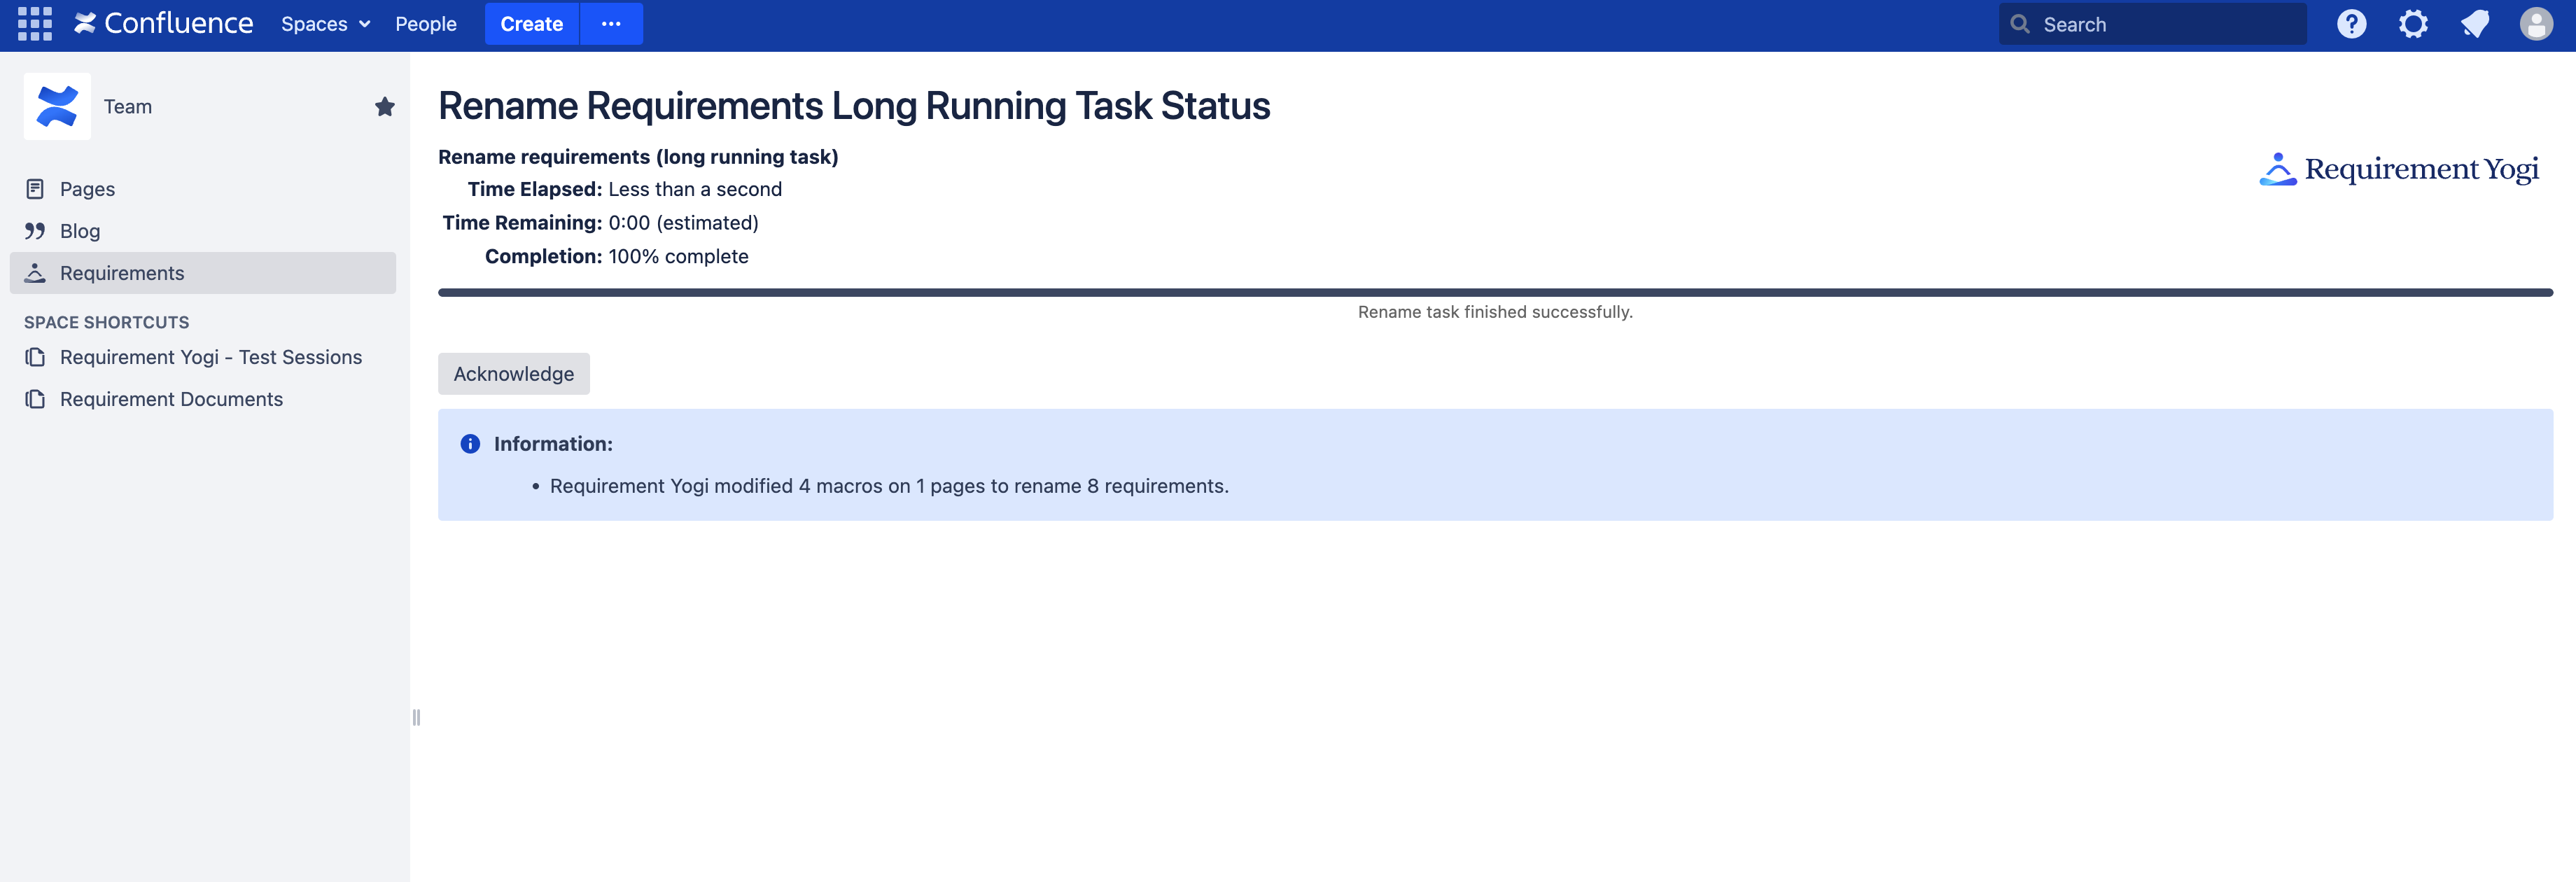
Please note that this task can take a while if you rename many requirements, so be patient. The progress bar is updated frequently and automatically to inform you about the progress of the task, as well as the status under this progress bar. Please also note that the "Time remaining" is only an estimation and can be inaccurate.
Once it's done, a button named "Acknowledge" appears. Click on it to be redirect to the Requirement Yogi Search screen. This is the recommended way, rather than using the menu bar, as this also tells Confluence to stop tracking the task.

If an error occurs, it will appear at the bottom of the screen. As the status indicates, "No modification was saved", your requirements are safe. This behavior can yet be problematic if the error is thrown from JIRA, as the link between Confluence and JIRA is error-prone. For example, you can have an authentication error. Moreover, if you delete your Application Link, Requirement Yogi keeps a trace of the links in JIRA, just in case you will recreate your Application Link. This is useful, but in case of renaming, it will test the connection with JIRA and fail. This is why we added a check box "Ignore JIRA errors" in the renaming wizard. If you tick it, JIRA errors will be displayed as warning and will not cancel the renaming task (other errors still cancel it). However, if you choose to ignore JIRA errors and an error occurs, your JIRA issues won't be updated. Thus, your requirements links in JIRA will be incorrect, and you will not be able to synchronise them (because they have been renamed, in the JIRA point of view it is no longer the same requirement) and you will have to remove the former links and add the new manually.
You can also cancel the task, by clicking on the "Stop and cancel" button at the bottom of the task status page.
Permissions
A user can rename requirements when he is:
-
A global administrator
-
Part of a Confluence Group of users
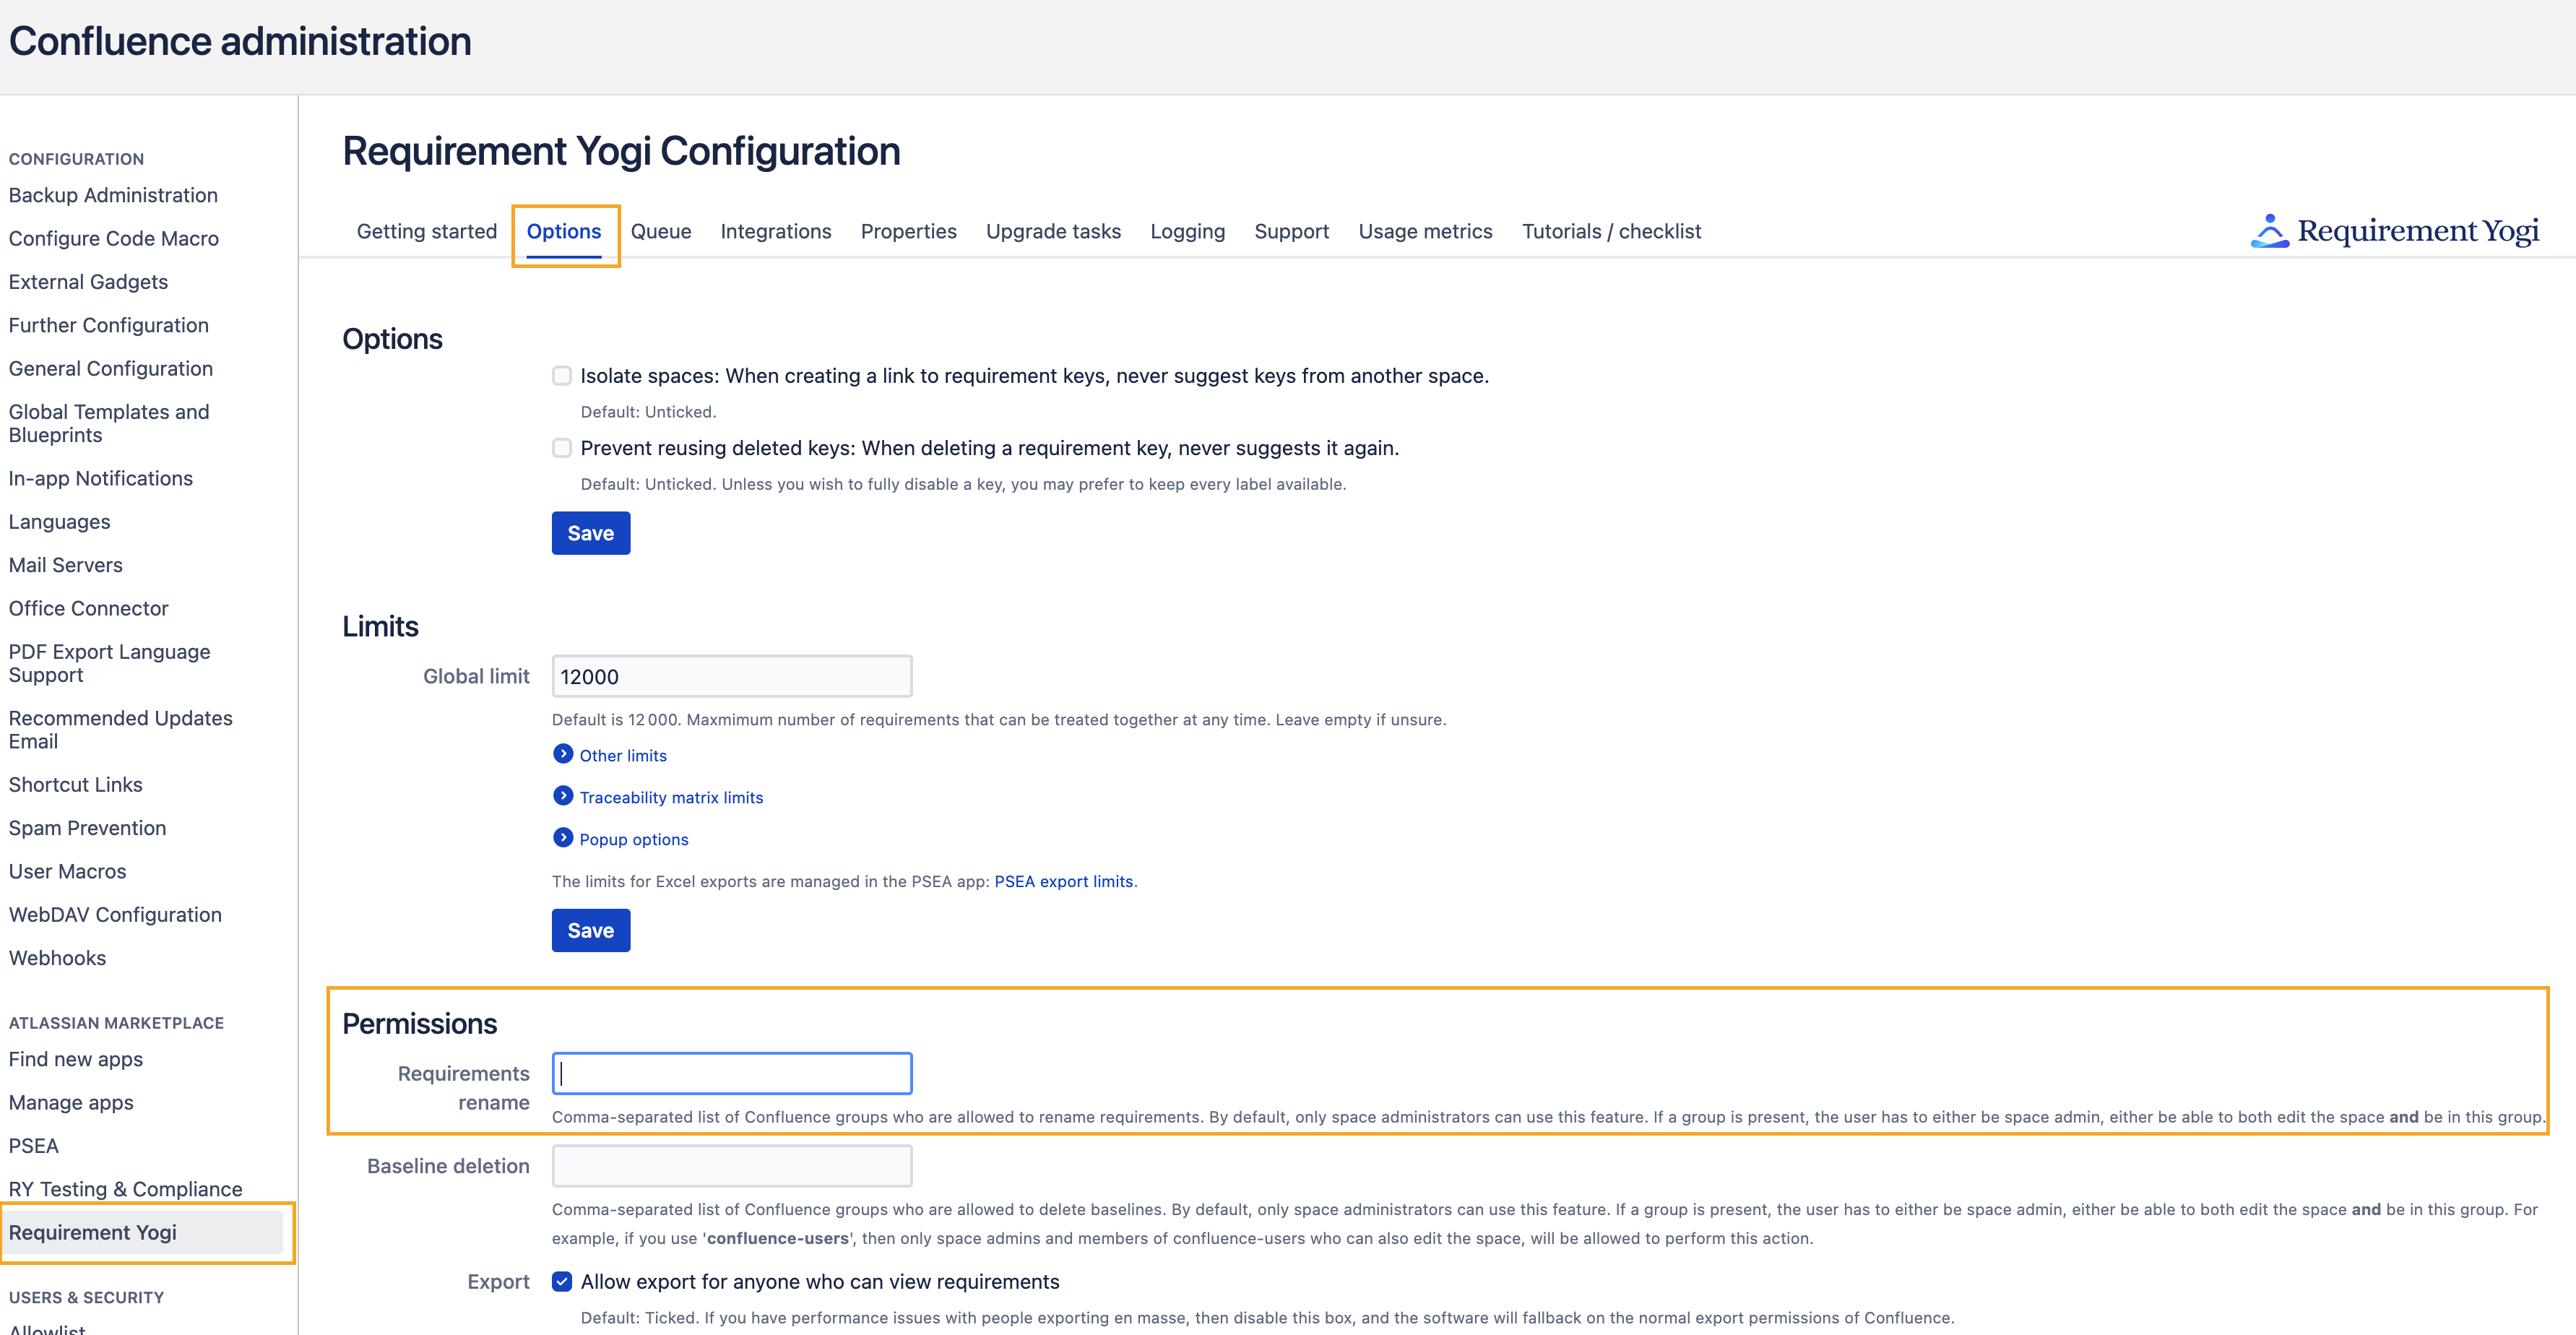
To allow this group of users to rename requirements, you need to go in the Requirement Yogi Configuration → Options → Permissions → Requirement rename.
Here is how to create a group of users in Confluence, and here is how to add people in them.
Limitations
Integration with the Scaffolding Live Templates app
Requirement Yogi won't be able to rename and move requirements which are located in Scaffolding's live templates. Technically, RY edits the XHTML source of the wiki page, so RY can only help with moving and renaming if requirements stored in "ContentEntityObjects". If you proceed, you will find:
-
When moving a page to another space and there are requirements in a Scaffolding template:
-
The next time the page is edited, the requirements will be created in that space.
-
If there are references to requirements in the moved page, they will be assumed to be in the same space and marked in red if the requirements can't be found.
-
In the older space, pages which reference them will show the macros in red ("requirement not found").
-
-
When renaming requirements automatically:
-
The requirement won't be found, and therefore not renamed, if it is within a Scaffolding template.
-
